Five Looks - Go-To Glam

Look5-2.jpg

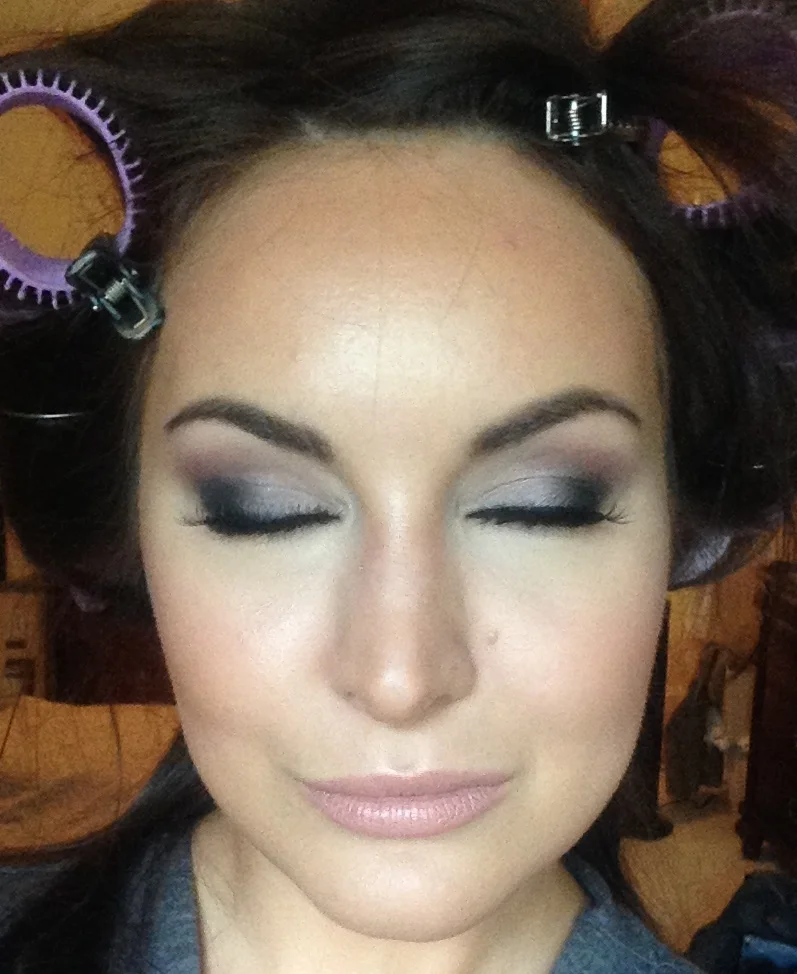
So far we've mastered The Minimalist, The Work Appropriate, The Bright Eye/Bold Lip, and The Smokey Eye/Nude Lip. Our final look is The Go-To Glam.  When it’s time to get dressed up, I want my makeup to look special.  That doesn’t mean, however, that I need to do more work than any of the other looks!  If you notice red carpet makeup, it’s usually not over-the-top so the focus remains on the clothes.  What sets this look apart is that it’s ready for photos, meaning the makeup needs to be a little brighter and slightly more opaque so it shows up, and the best way to test this is to take a bunch of selfies in different lights.  My favorite GTG look is sculpted, with emphasis on the eyes.  Since this look is very individualized, I’m not going to bore you with all the steps here.  What I hope you take away – listen up, brides! – is how intense this makeup comes off in-person as compared to in a photograph.

Every makeup look I do falls under one of these five.  Once you get the hang of which looks you prefer (or all of them...), you will begin to see how swapping in a different eye shadow color or using bronzer instead of blush will give you an endless combination of different looks.  Have fun!

  Look5

Look5 - 3

Five Looks - Smokey Eye/Nude Lip

senl1.jpg

For the fourth of five makeup looks to master (you can see the others here, here and here), allow me to introduce The Smokey Eye/Nude Lip - this is my favorite look of all time.  It also tends to be the one brides ask for the most, but then feel it’s too much for their wedding day once they see it on.  If you want to emphasize your eyes, remember that you can do that with any color of shadow, not just dark colors. While there are endless variations of a smoky eye, this is the way I teach it: prep the eye lids with a little concealer and a very slight dusting of powder or skin-colored shadow.  Pick three complementary colors in light, medium, and dark shades: dark brown, medium brown, and light brown…or plum, light brown, and gold…whatever.  Take an eyeliner the same color as your darkest shadow, line your top lashes, then smudge with your finger and apply the darkest color directly on top of the liner – not the entire lid.  Swipe the medium shade right in your crease, and the lightest shade over the medium color up to your brow bone.  Add another layer of liner close to the lashes, then apply mascara.  Clean up any “fallout” from the shadow underneath your eyes, and finish your makeup, ending with a natural lip.  It sounds like a lot of work, but I promise once you get the hang of it and know right were to put everything, it will go quickly.  You can see a demo here.


Five Looks - Bright Eyes/Bold Lip

BEBL.jpg

Our next look is the Bright Eyes/Bold Lip (here are the first and second looks).  Since most people I’ve worked with seem more confident by enhancing their lips, this look is usually their go-to when they want a little something extra.  It’s also great if you’re running late but still want to look stunning. Make sure your skin is moisturized, and use foundation and concealer for a gorgeous canvas.  Set with powder then highlight and contour, making sure to add a little luminizer to the cheek bones – you can skip the blush unless you want it, but make sure it’s muted.  Draw on black liner (a cat eye is always fun) and use lots of mascara and/or false lashes.  Fill in brows, then line lips with a neutral pencil.  Apply your favorite bold lip color, blot, and reapply.  Set the look with setting spray, and make sure there’s no lipstick on your teeth!

Five Looks - The Work Appropriate

image.jpg

The second look to master, the Work Appropriate, is the look I get asked about most (you can find the first look here).  This application should happen on autopilot with one hand free to deal with everything that inevitably comes up while trying to get out the door, so I like to keep it simple while still making an impact.  The goal for this is to look pulled-together without trying too hard or needing more than a couple of touch-ups throughout the day. My go-to builds on The Minimalist: tinted foundation, concealer, cream blush, powder foundation, powder bronzer (used on the face and as eye shadow), brows, eye liner, mascara, and lipstick, then I set everything with a setting spray.  In my bag, I keep a travel-sized bottle of setting or refreshing spray, along with lip gloss, blotting papers, and concealer.  You can always go with a soft (or no) eye liner and a lip with a little punch, or focus on your eyes with a more intense liner and a natural lip, or go bold or neutral with both eyes and lips – this look is so easy to customize.

Five Looks - The Minimalist

Minimalist.jpg

A good wardrobe has a few versatile, basic pieces: an LBD, a structured blazer, a crisp oxford.  These staples are the basics for several different scenarios, from the office to a wedding guest.  Your makeup wardrobe follows the same arrangement; foundation, concealer, mascara, and lipstick are the building blocks for endless “outfits.”  With that in mind, here is the first of five makeup looks that, once they become second nature, will give you a solid repertoire for any situation. I feel that too often we’re shown images that have been over-doctored, so all of the photos for these looks were taken in natural light with an iPhone - no fancy lighting, filters or lenses - so you get a great idea of how the makeup will turn out.

The first look, The Minimalist, is a quick go-to for weekends or running errands.  It's a simple routine that will enhance features enough to show that you didn’t just roll out of bed.  I apply a tinted foundation, a little gel eyeliner, fill in my brows, add a touch of concealer around my nose and eyes, mascara, and a little lip gloss or lip balm.