Makeup Shakeup

One Palette Three Ways ~ Smokey

IMG_8341.jpg

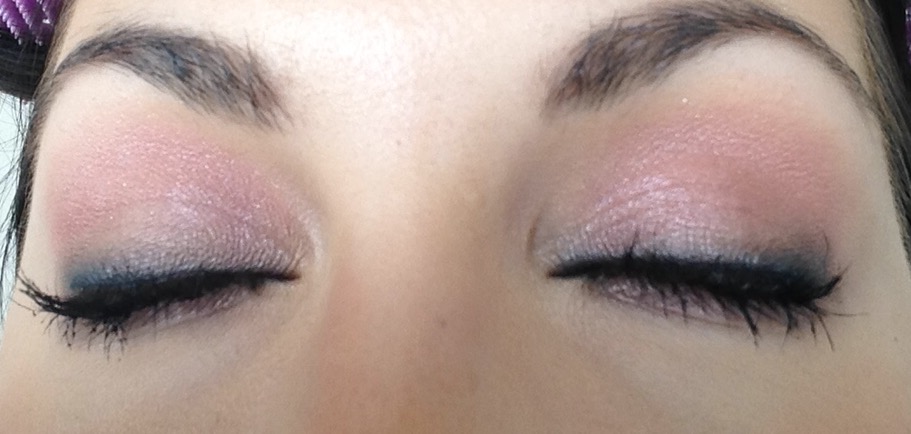
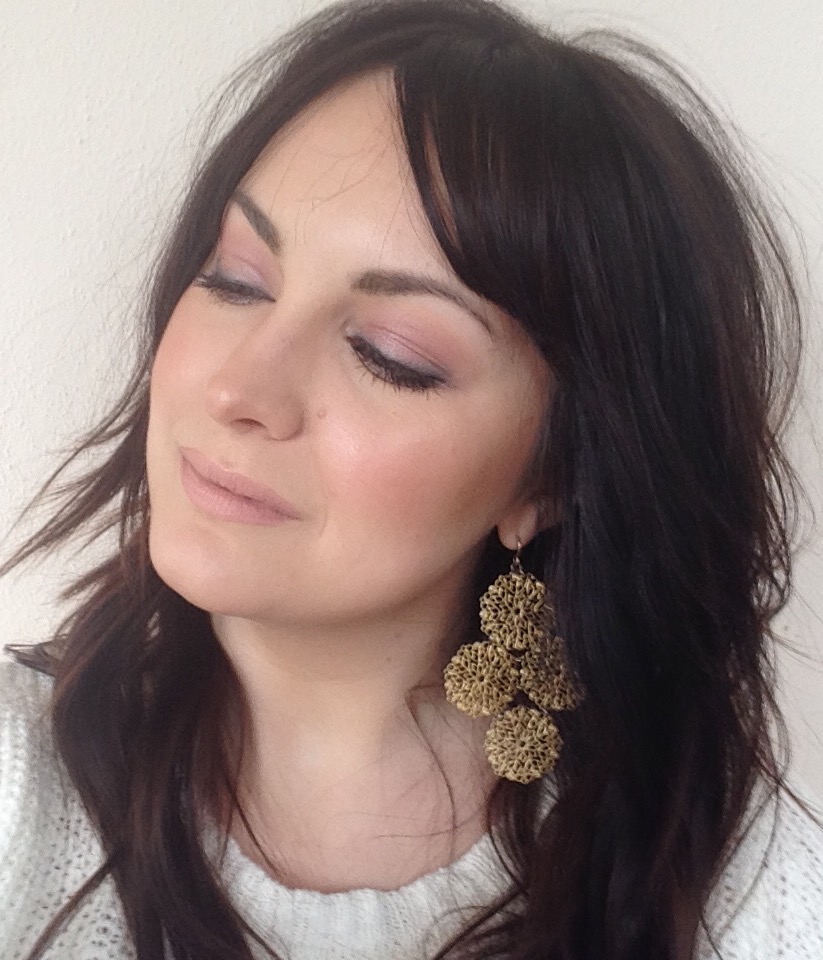
It might be hard to believe, but we are down the the last three colors in my Urban Decay Naked 3 palette!  Since we've already done a halo and dramatic eye, let's do a traditional smokey look.

We're using Mugshot as the darkest color, Buzz in the center, and Burnout to blend.  I love to remind my clients that just because you do a smokey eye technique, you can still use soft colors.

Here's the video tutorial with step-by-step directions below:

I started with a little concealer and translucent powder to prep, then started with the darkest color, Mugshot.

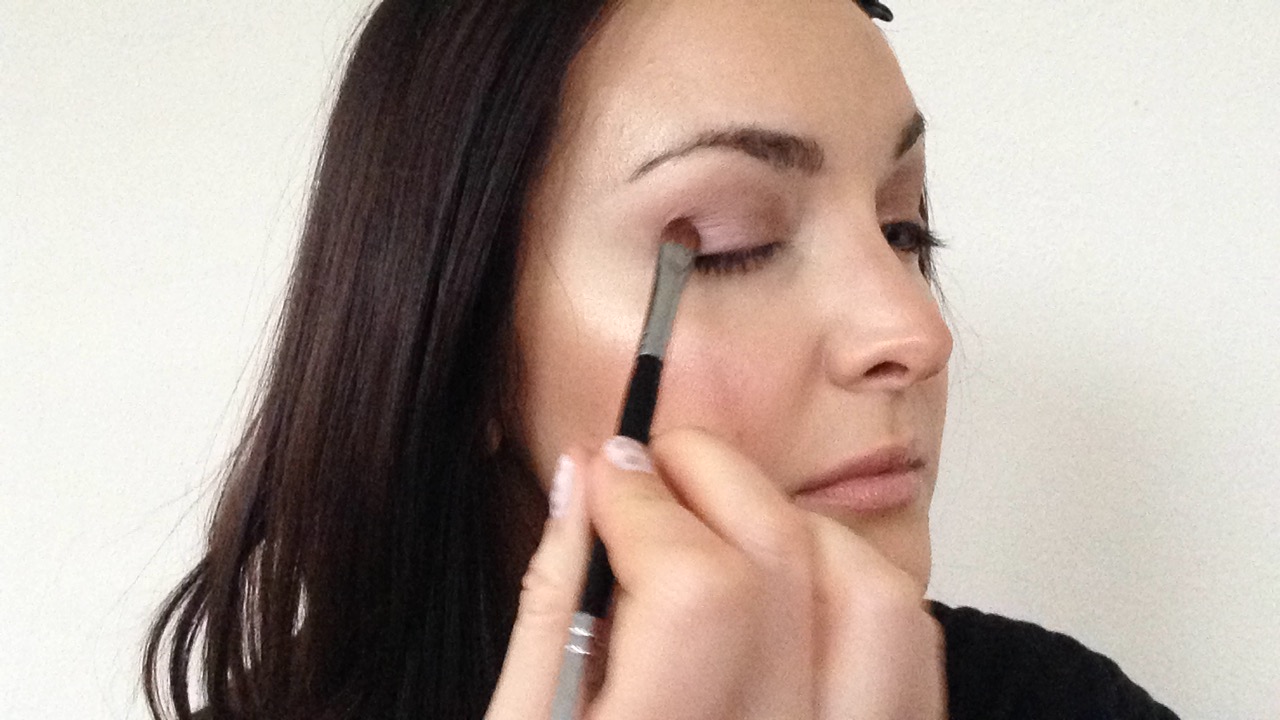
Line upper lash line

With a smudger, like this contour brush from e.l.f. cosmetics ($3!), apply your darkest color to the top lash line.


Blend into crease

Take your typical eye shadow brush (MAC 239) and add your mid-tone shade (Buzz) to the lid and up into the crease.

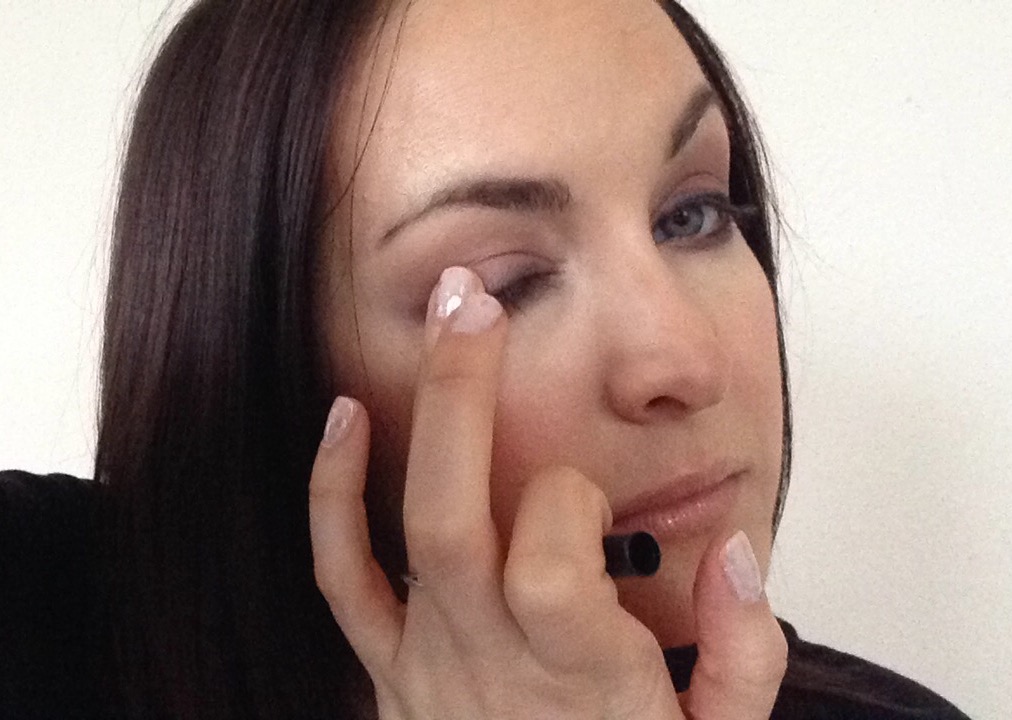
Blend edges with lightest shade

Taking a small blending brush (MAC 221) and your lightest shade (Burnout), blend all the edges so the color disappears into nothing.


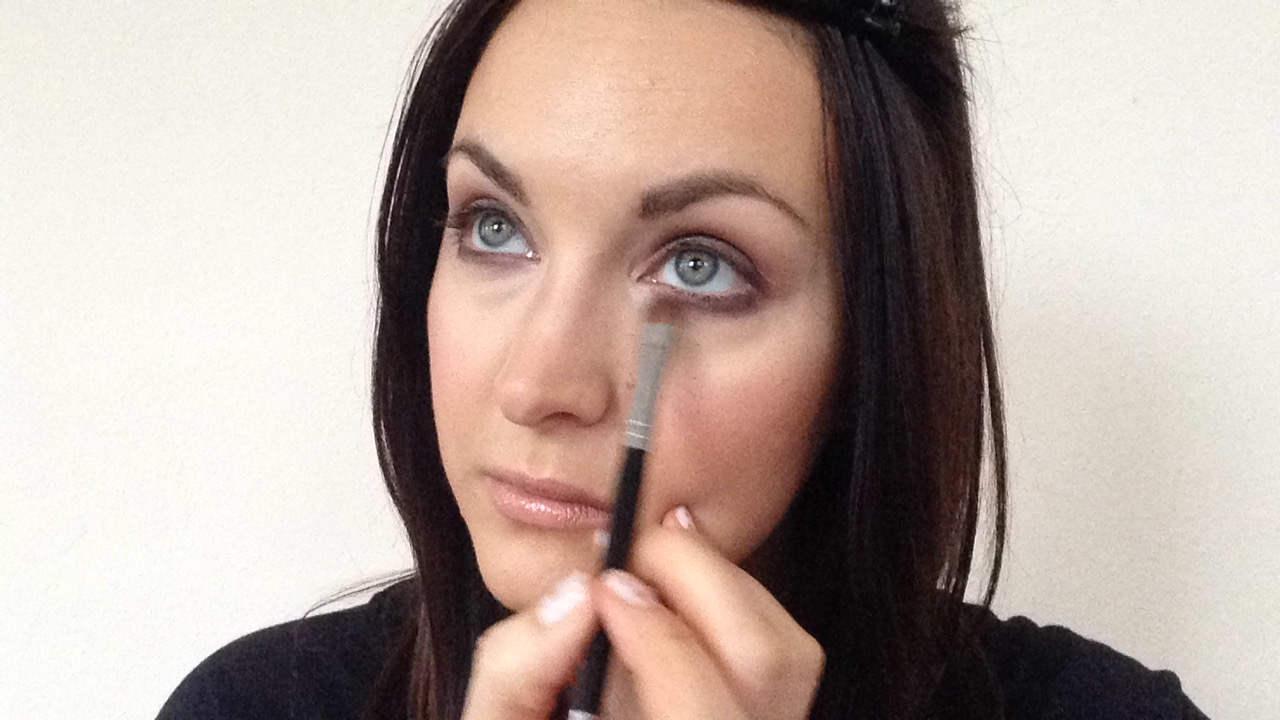
Smoke out under eye area

Starting with the smudge brush and a little of your darkest shade, start from the outside corner and work your way in under the lower lash line so the color is darkest on the outer corner.


Then, starting with your blending brush and the lightest shade, work from the inner corner to the outward and blend the two shadows.

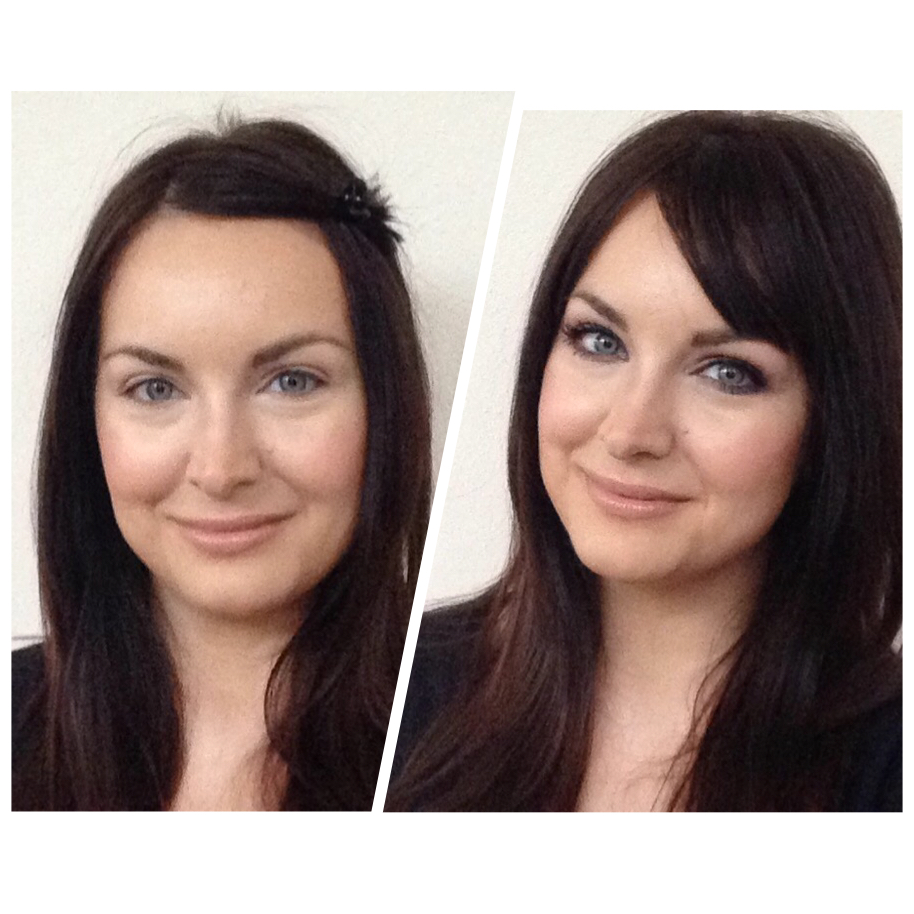
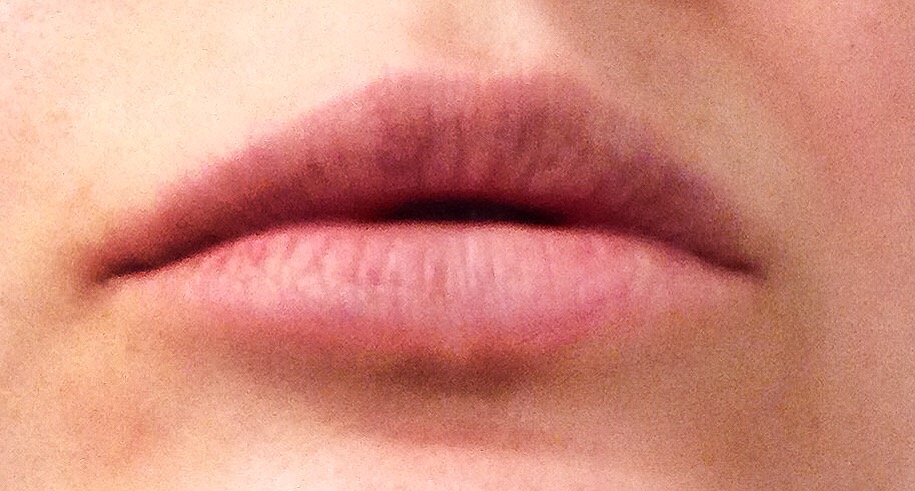
Add liner, curl lashes, apply mascara, and voila:

IMG_8315

IMG_8329

~~~~~

I hope you enjoyed this series and that you finally get full use from those eye shadow palettes.  What else what you like to see?  Reach out @ElectraLane on Facebook, Instagram or Snapchat and let me know.

P.S. Please disregard my messy bangs in these photos - I do makeup, not hair. :)

One Palette Three Ways ~ Dramatic

IMG_8479.jpg

Of all the eye shadow looks, this is my absolute favorite.  Some might save it for a special occasion, but with soft colors like we're using today, you'll see how it is very wearable.  Last week, I showed you the "halo" look, which is just a step up from a basic wash of color.  This week, the "dramatic" look is a take on the basic light-all-over-lid-darker-shade-in-crease look.  There are quite a few steps, but I think you'll discover your own method of this look with time and practice. Here's the video tutorial with the step-by-step instructions below:

Still using the Naked 3 palette by Urban Decay, we start with prepping the lids with a little shadow primer or concealer, then a light dusting of powder.

Etch out a crease

Using Limit  apply to the entire area from just above your eyeball up to your brow bone.  Only blend as far out as the tail of your eyebrow.

Add dimension

On a smaller brush, sweep Nooner into the actual crease - where the skin folds when you open your eye - then go back and blend the two shades together with the first brush.

Create an outer corner

Load up a small brush and pat Blackheart onto the outer 1/3 of your lid, then gently blend into outer crease.

Add drama to the lid

With a clean brush, sweep Factory from the inner corner into Blackheart and blend.

Spotlight

Dip your ring finger into Trick and Dust, then tap lightly on the center of your lid.  This will keep the lid from becoming too heavy.

Highlight

Use your pinky or a small brush to apply Strange just to the inner corners.  Blend any rough edges.

Smudge under eye

With the brush you used for the darkest color, add a little more Blackheart and smudge on the bottom 2/3 of the lash line.  You might need to add a little more of the highlight to the inner corner.

IMG_8459

IMG_8485

~~~~~

Only three colors left in the palette!  Meet me back here next week to see how to use them and, in the meantime, make sure to follow me on Instagram and Snapchat @ElectraLane and Facebook.com/Electra Lane.

One Palette Three Ways ~ Halo

IMG_8086.jpg

Eye shadow palettes are like candy. They're so pretty that I never seem to know which one to choose - and too many can't be good. If you're new to makeup and aren't yet sure of your style, a palette is an economical way to try many different options...but most of us tend to only use two or three favorite shades. Since I was off last week, this month's For Better or Worse can quickly be summed up with this: the worst palette is the one you never use, and the best one is the on you use almost daily!  I reach for either my custom palette or one of my Urban Decay Naked palettes most often.

Using my Urban Decay Naked 3 palette, I'll show you how to take the guesswork out of using eye shadow palettes over the next few weeks.  Today,  you'll discover how to do what I'll call a "halo" shadow look (because the darker shadow forms a circle around your eye).


Prep lids

IMG_8070

I used a little concealer and a light dusting of translucent powder

Apply a wash of color with a paddle brush

IMG_8076

Using the larger end of Stila brush #15, I applied Liar (a dusky lavender with a little sheen) all over the lid and crease.

Sweep a darker shade on the top and bottom lash lines with a pencil brush

IMG_8078

IMG_8082

After using Darkside, I went back and blended with my finger.

IMG_8084

Finish with eyeliner (MAC Smolder) and mascara (NARS Audacious)

IMG_8092

IMG_8093

That's it!  Seriously.  It's that simple.  But if you do have questions, here's a video...

...and you can always snap me on Snapchat (user = ElectraLane).

See you next week when we do a dramatic look!

P.S. The queen of this look is Cara from Maskcara - you need to check out her Makeover Mondays.


May the Force Be With You (in 2016)

IMG_6433.jpg

As 2015 comes to a close, I want to leave you with a few tidbits that I've learned over the year.

  1. Speak Up

A lovely friend of mine called, slightly distressed, before her wedding because the makeup artist she hired did a less-than-stellar job during the trial.  Basically, I suggested that, as soon as possible, she tell the makeup artist everything she had just told me - even though it would be awkward.  Good makeup artists want to make you happy so, as long as you don't spring bad news on them last minute, they should be more than happy to make any changes.

This is something I've put into practice in life, too.  I'm the type of person to just let things go unless it's really worth fighting for, but the problem with that is I'm left with a sub-par experience.  While it's never okay to be rude, double checking with the hostess or letting the cashier know he double-scanned those bananas in a kind tone will make everyone happier.

By the way, my friend had a great conversation with her makeup artist and looked positively stunning on her wedding day.

2.  Try New Things

I've been wearing a lot of red-toned eye shadows lately.  Whodathunk?  My husband has cut back on red meat (when we met, he was downing it five+ days a week), and I haven't had a manicure in over a year because I learned how to do my nails better than the salon.  Not everything I've tried works out, but at least I tried, and there's a peace of mind associated with taking those things and putting them behind me   - it's much easier than always wondering.

So try the crazy smokey eye.  Complement the crabby barista.  Ask your friend out for coffee even if there's a good chance she'll turn you down.  You never know.  And if you don't try, the answer will always be no.

Speaking of a crazy smokey eye, here's a fun, sparkly look:

3.  Less is More

Glamorous makeup aside, I've been transitioning into a more minimalist routine.  Now, I keep a carefully curated makeup bag stocked with just the basics so I can be on my way in five minutes or less.  Spoiler alert - one of the big changes coming next year is that we're moving.  As we start to purge our belongings, we realized that we don't use at least a third of our stuff.  It's the same way in makeup.  Even the leanest of bags I've helped to edit have at least two or three items that need thrown out or replaced.  So, in 2016, I encourage you to get rid of the things that no longer serve you - both in your makeup bag and in life - and treat yourself to the things that make you smile.

I truly hope you have a wonderful holiday season.  Please stay in touch with me @ElectraLane on your favorite social media site, and cheers to the new year!  See you in 2016!

#NOTWorthIt

IMG_6420.jpg

While I don't begrudge certain young celebrities for their endorsement power, it's frustrating when young, impressionable girls go to great, and sometimes harmful, lengths to look like said starlets.  Such is the case with the #KylieJennerLipChallege, where you use a shot glass and suction to plump your lips.

FullSizeRender

And, like any trend, full, pouty lips have become the biggest craze since strobing or full brows.  While I've discussed how to make your lips appear larger with makeup, that method takes quite a bit of time and requires several touch-ups.

So I tried a lip-plumping tool, which I Instagrammed (@ElectraLane) several weeks ago:

image1 (1)

Since then, I've tried using this device, which declares that it not only plumps your lips but works out the muscles around your mouth to reduce smile lines.  It did neither.

In fact, the last time I used it, it actually bruised my lips:

ouch.

The lighting isn't great, but IRL it looked like I had just downed a few glasses of red wine.

So, short of fillers or implants, what's a good solution that doesn't take 38 steps or a PhD in makeup?

SHADING.

Shading is like contouring in that it crates shadows, but it's far less involved.  I've created a quick instructional video, but basically, you line your lips with bronzer.  It takes a little practice and the right product shade, but because it's powder, it stays on and looks far more natural than a lip liner.

Let's be honest - our lips are just fine the way they are.  But, if you do want to give the illusion of fuller lips like I often do, I hope you give shading a chance.  The other options simply are #NOTWorthIt.